Portal flow
This integration pattern is suitable for senders who want to create a signature job in portal flow. The signer logs in to the signing portal, signs the document, and the sender will then be able to poll for a status and retrieve the signed document. This scenario is designed to support a flow where it is necessary to obtain signatures from more than one signer.
To ease the integration, we provide C# and Java libraries. If you are creating your own client, you will have to interact directly with the API. The message format of the API is XML, and relevant types can be found in portal.xsd.
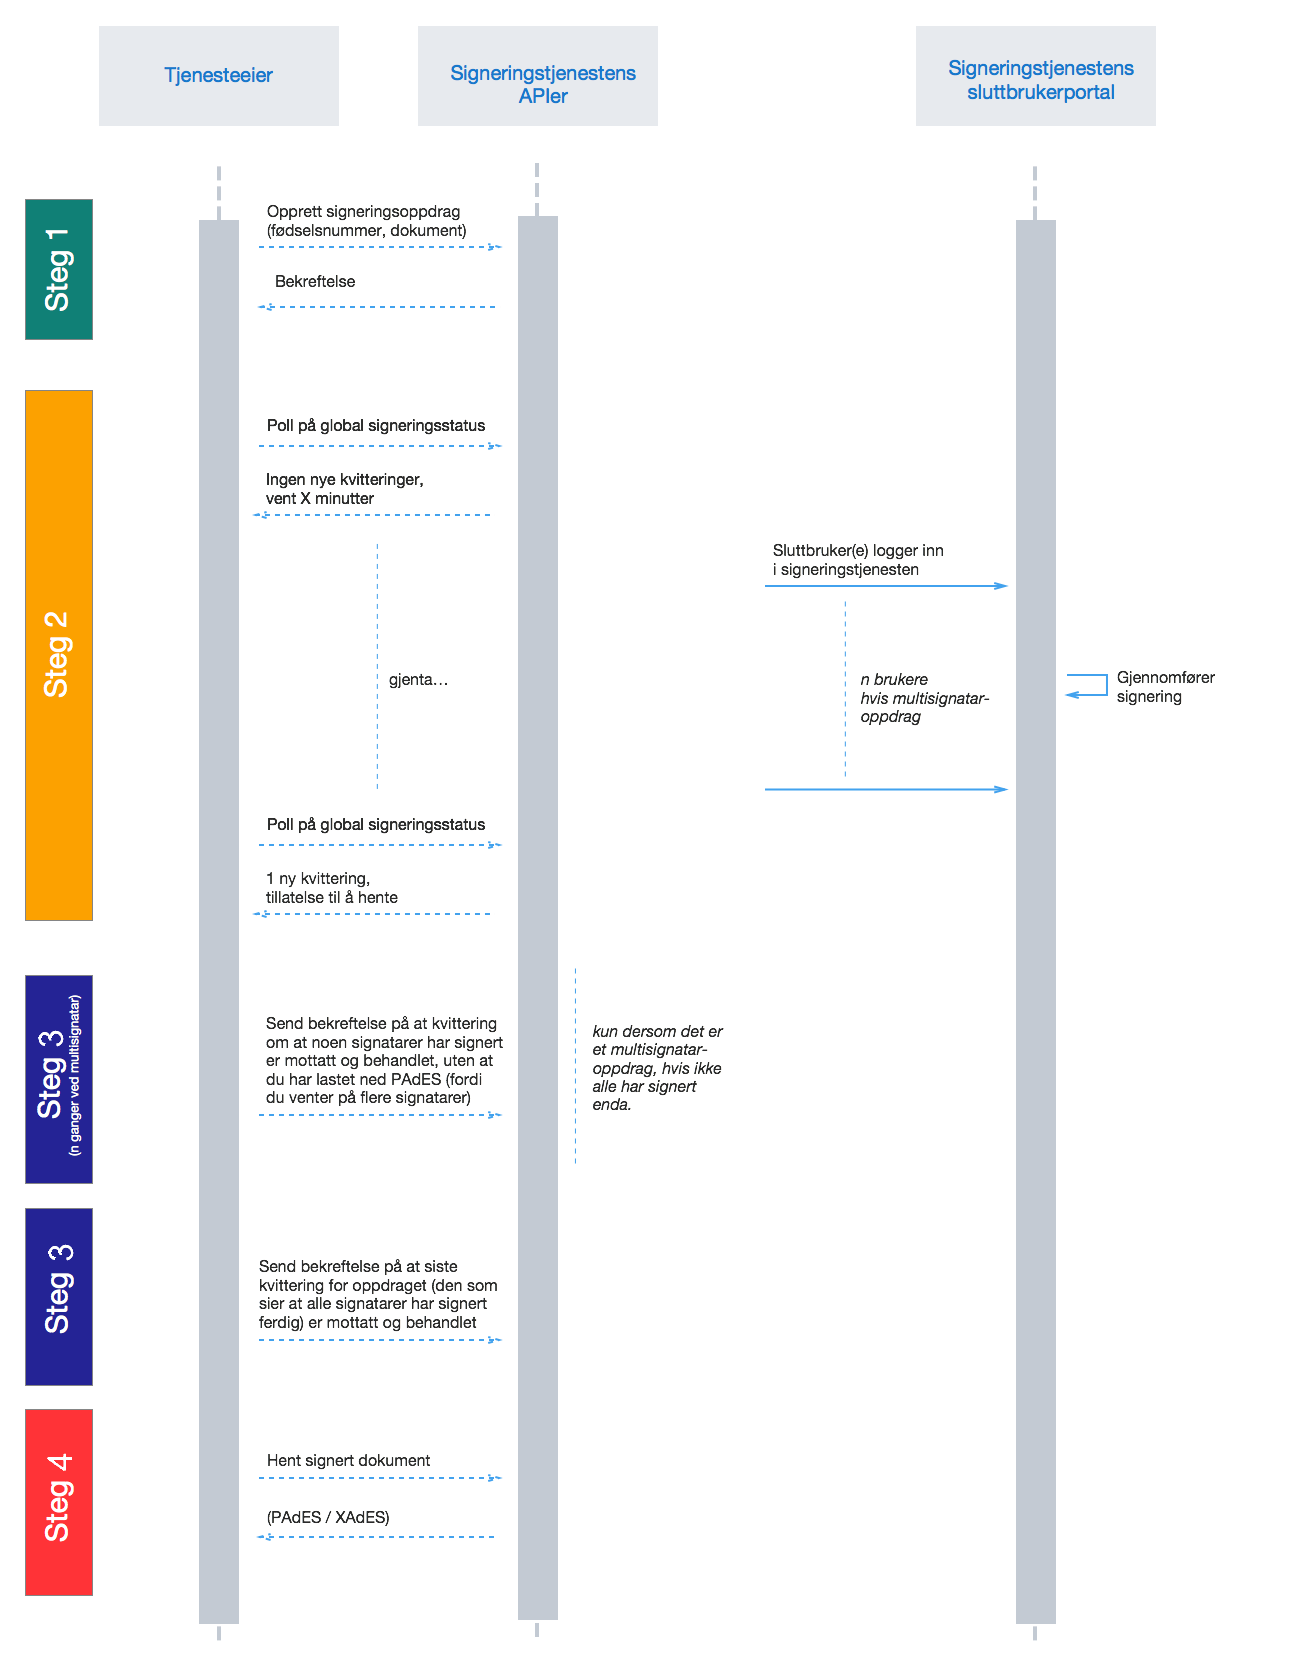
Flow chart for signing in portal flow: The chart shows that a sender creates a signature job, starts polling, signers signing the job, a status update is fetched by polling by the sender, followed by downloading the signed document. If you send only one job to one signer, please disregard the first “steg 4”-section. Solid lines show user flow and dashed lines shows requests to and responses from the API.
Having problems integrating?
Tip
Remember that if you are having problems creating a job in a portal signature flow, you can always get in touch with a developer on Github:
Get help for your C# integration here.
Get help for your Java integration here.
Get help for your HTTP integration here.
Step 1: Create signature job
ClientConfiguration clientConfiguration = null; //As initialized earlier
var portalClient = new PortalClient(clientConfiguration);

var documentsToSign = new List<Document>
{
    new Document(
        "Document title",
        FileType.Pdf,
        @"C:\Path\ToDocument\File.pdf"
    )
};

var signers = new List<Signer>
{
    new Signer(new PersonalIdentificationNumber("00000000000"), new NotificationsUsingLookup()),
    new Signer(new PersonalIdentificationNumber("11111111111"), new Notifications(
        new Email("email1@example.com"),
        new Sms("999999999"))),
    new Signer(new ContactInformation {Email = new Email("email2@example.com")}),
    new Signer(new ContactInformation {Sms = new Sms("88888888")}),
    new Signer(new ContactInformation
    {
        Email = new Email("email3@example.com"),
        Sms = new Sms("77777777")
    })
};

var portalJob = new Job("Job title", documentsToSign, signers, "myReferenceToJob");

var portalJobResponse = await portalClient.Create(portalJob);
ClientConfiguration clientConfiguration = null; // As initialized earlier
PortalClient client = new PortalClient(clientConfiguration);

byte[] document1Bytes = null; // Load document bytes
byte[] document2Bytes = null; // Load document bytes
List<PortalDocument> documents =  Arrays.asList(
        PortalDocument.builder("Document 1 title", document1Bytes).build(),
        PortalDocument.builder("Document 2 title", document2Bytes).build());

List<PortalSigner> signers = Arrays.asList(
        PortalSigner.identifiedByPersonalIdentificationNumber("12345678910",
                NotificationsUsingLookup.EMAIL_ONLY)
                .build(),
        PortalSigner.identifiedByPersonalIdentificationNumber("12345678911",
                Notifications.builder().withEmailTo("email@example.com").build())
                .build(),
        PortalSigner.identifiedByEmail("email@example.com")
                .build());

PortalJob job = PortalJob
        .builder("Job title", documents, signers).build();

PortalJobResponse jobResponse = client.create(job);
The flow starts when the sender sends a request to create the signature job to the API. This request is a multipart message comprised of a document bundle part and a metadata part.
The request is a
HTTP POSTto the resourceapi.<environment>.signering.posten.no/api/<organization-number>/portal/signature-jobs, where<environment>isdifitestor just remove the environment part for the production environment.The document bundle is added to the multipart message with
application/octet-streamas media type. See Document package for more information on the document bundle.The metadata in the multipart request is defined by the
portal-signature-job-requestelement. These are added with media typeapplication/xml.
The following example shows metadata for a signature job in a portal flow:
<portal-signature-job-request xmlns="http://signering.posten.no/schema/v1">
    <reference>123-ABC</reference>
    <polling-queue>custom-queue</polling-queue>
</portal-signature-job-request>
An example of the manifest.xml from the document bundle for a singature job that is to be signed by four signers:
<?xml version="1.0" encoding="UTF-8" standalone="yes"?>
<portal-signature-job-manifest xmlns="http://signering.posten.no/schema/v1">
    <signers>
        <signer order="1">
            <personal-identification-number>12345678910</personal-identification-number>
            <notifications>
                <email address="signer1@example.com" />
                <sms number="00000000" />
            </notifications>
        </signer>
        <signer order="2">
            <personal-identification-number>10987654321</personal-identification-number>
            <notifications>
                <email address="signer2@example.com" />
            </notifications>
        </signer>
        <signer order="2">
            <personal-identification-number>01013300001</personal-identification-number>
            <notifications-using-lookup>
                <email/>
                <sms/>
            </notifications-using-lookup>
        </signer>
        <signer order="3">
            <personal-identification-number>02038412546</personal-identification-number>
            <notifications-using-lookup>
                <email/>
            </notifications-using-lookup>
        </signer>
    </signers>
    <sender>
        <organization-number>123456789</organization-number>
    </sender>
    <title>Required job title</title>
    <nonsensitive-title>Optional non-sensitive job title</nonsensitive-title>
    <description>
        Optional description of the job. May be a summary of the document to be signed,
        or any message one wish to communicate when the signer is going to sign the document.
    </description>
    <documents>
        <document href="document.pdf" mime="application/pdf">
            <title>First document</title>
        </document>
        <document href="document2.pdf" mime="application/pdf">
            <title>Second document</title>
        </document>
    </documents>
    <availability>
        <activation-time>2016-02-10T12:00:00+01:00</activation-time>
        <available-seconds>864000</available-seconds>
    </availability>
    <identifier-in-signed-documents>PERSONAL_IDENTIFICATION_NUMBER_AND_NAME</identifier-in-signed-documents>
</portal-signature-job-manifest>
In response to this call, you will get the element portal-signature-job-response. This response contains an ID generated by the signing service. You must store this ID in your systems so that you can later link the results you get from the polling mechanism to the correct signature job.
<portal-signature-job-response xmlns="http://signering.posten.no/schema/v1">
   <signature-job-id>1</signature-job-id>
   <cancellation-url>https://api.signering.posten.no/api/{sender-identifier}/portal/signature-jobs/1/cancel</cancellation-url>
</portal-signature-job-response>
Note
You may identify the signature job’s signers by personal identification number IdentifiedByPersonalIdentificationNumber or contact information. When identifying by contact information, you may choose between instantiating a PortalSigner using IdentifiedByEmail, IdentifiedByMobileNumber or IdentifiedByEmailAndMobileNumber.
Addressing signers
It is helpful to familiarize yourself with Addressing signers and Notifications and contact details to understand the different ways a signer can be addressed and notified. All examples given below are not applicable for all kinds of senders, particularily there restrictions depending on whether the sender is a public or private sector organization.
Email address and/or mobile number
var signers = new List<Signer>
{
    new Signer(new ContactInformation {Email = new Email("email2@example.com")}),
    new Signer(new ContactInformation {Sms = new Sms("88888888")}),
    new Signer(new ContactInformation
    {
        Email = new Email("email3@example.com"),
        Sms = new Sms("77777777")
    })
};
import static no.digipost.signature.client.portal.PortalSigner.*;

...

List<PortalSigner> signers = List.of(
        identifiedByEmail("email@example.com").build(),
        identifiedByMobileNumber("12345678"),
        identifiedByEmailAndMobileNumber("person@example.com", "87654321"));
<signer>
    <identified-by-contact-information/>
    <notifications>
        <email address="email@example.com"/>
    </notifications>
    <on-behalf-of>SELF</on-behalf-of>
</signer>
<signer>
    <identified-by-contact-information/>
    <notifications>
        <sms number="00000000" />
    </notifications>
    <on-behalf-of>SELF</on-behalf-of>
</signer>
<signer>
    <identified-by-contact-information/>
    <notifications>
        <email address="email@example.com"/>
        <sms number="00000000" />
    </notifications>
    <on-behalf-of>SELF</on-behalf-of>
</signer>
National identity number
When identifying signers by their national identity number, you can specify which email address and/or mobile number should be used for for notifications.
var signers = new List<Signer>
{
    new Signer(
        new PersonalIdentificationNumber("11111111111"),
        new Notifications(
            new Email("email1@example.com"),
            new Sms("999999999"))),
    new Signer(
        new PersonalIdentificationNumber("22222222222"),
        new Notifications(
            new Email("email2@example.com")))
};
import static no.digipost.signature.client.portal.PortalSigner.*;

...

List<PortalSigner> signers = List.of(
    identifiedByPersonalIdentificationNumber("11111111111",
            Notifications.builder()
                .withEmailTo("email1@example.com")
                .withSmsTo("999999999").build())
        .build(),
    identifiedByPersonalIdentificationNumber("22222222222",
            Notifications.builder()
                .withEmailTo("email2@example.com").build())
        .build());
<signer>
    <personal-identification-number>11111111111</personal-identification-number>
    <notifications>
        <email address="email1@example.com"/>
        <sms number="999999999" />
    </notifications>
</signer>
<signer>
    <personal-identification-number>22222222222</personal-identification-number>
    <notifications>
        <email address="email2@example.com"/>
    </notifications>
</signer>
However, for public sector organizations, if the documents being signed are of a personal nature (e.g. not signed by virtue of a role in an organization) it is strongly advisable to have Posten signering inquiring The common contact register to lookup which methods the signer prefers to be notified. (This feature is not available at all for private sector organizations)
See also the section Signing on behalf of for information on signing on behalf of other entities (e.g. organizations).
var signers = new List<Signer>
{
    new Signer(
        new PersonalIdentificationNumber("11111111111"),
        new NotificationsUsingLookup { SmsIfAvailable = true }),
    new Signer(
        new PersonalIdentificationNumber("22222222222"),
        new NotificationsUsingLookup())
};
import static no.digipost.signature.client.portal.PortalSigner.*;

...

List<PortalSigner> signers = List.of(
    identifiedByPersonalIdentificationNumber("11111111111",
            NotificationsUsingLookup.EMAIL_AND_SMS).build(),
    identifiedByPersonalIdentificationNumber("22222222222",
            NotificationsUsingLookup.EMAIL_ONLY).build());
<signer>
    <personal-identification-number>11111111111</personal-identification-number>
    <notifications-using-lookup>
        <email/>
        <sms/>
    </notifications-using-lookup>
</signer>
<signer>
    <personal-identification-number>22222222222</personal-identification-number>
    <notifications-using-lookup>
        <email/>
    </notifications-using-lookup>
</signer>
Signing on behalf of
A sender can specify if signers are signing on behalf of theirself (“self”, the default if not specified), or on behalf of or by virtue of a role (“other”).
In the case of signing on behalf of “other”, the features intended for private citizen services will not be available. This means:
The signed document will not be automatically forwarded to the signer’s private digital mailbox.
For public organizations, The common contact register will not be used, and the sender must provide the email address and/or mobile number to use for notifying the signer.
var signers = new List<Signer>
{
    new Signer(
        new PersonalIdentificationNumber("11111111111"),
        new NotificationsUsingLookup()),
    new Signer(
        new PersonalIdentificationNumber("22222222222"),
        new Notifications(new Email("email2@example.com")))
    {
        OnBehalfOf = OnBehalfOf.Other
    },
    new Signer(
        new ContactInformation { Email = new Email("email3@example.com") }),
    {
        OnBehalfOf = OnBehalfOf.Other
    }
};
List<PortalSigner> signers = List.of(
    identifiedByPersonalIdentificationNumber("11111111111",
            NotificationsUsingLookup.EMAIL_ONLY).build(),
    identifiedByPersonalIdentificationNumber("22222222222",
            Notifications.builder().withEmailTo("email2@example.com").build())
        .onBehalfOf(OTHER).build(),
    identifiedByEmail("email3@example.com")
        .onBehalfOf(OTHER).build());
<signer>
    <personal-identification-number>11111111111</personal-identification-number>
    <notifications-using-lookup>
        <email/>
    </notifications-using-lookup>
    <on-behalf-of>SELF</on-behalf-of> <!-- default, optional -->
</signer>
<signer>
    <personal-identification-number>22222222222</personal-identification-number>
    <notifications>
        <email address="email2@example.com"/>
    </notifications>
    <on-behalf-of>OTHER</on-behalf-of>
</signer>
<signer>
    <identified-by-contact-information/>
    <notifications>
        <email address="email3@example.com"/>
    </notifications>
    <on-behalf-of>OTHER</on-behalf-of>
</signer>
Note
Public organizations collecting personal signatures should mainly address signers by their national ID, which mandates the use of Kontakt- og Reservasjonsregisteret for resolving their preferred contact information used for notifications of the signature job, and also to enforce their preference in case they opt-out from digital communication from the public sector.
Other settings
Non-sensitive title
The non-sensitive title optional property of a signature job is used, if present, to refer to the signature job in any insecure contexts, notably in email and SMS notifications for the signers. Although optional, it is strongly recommended to specify a non-sensitive title, because this allows to display some contextual information about the document(s) when signers are invited to sign them, and this decreases the chance of the notification being dismissed as spam. If a non-sensitive title is not specified, the notifications will fall back to a generic text describing something along lines of “some documents to sign”.
It is perfectly fine to set both the title (mandatory) and non-sensitive title (optional) to be the same text, but care should be taken to not include any personal or sensitive information in the non-sensitive title which will be included in insecure communication, notably emails and SMSes.
var portalJob = new Job("Job title", documentsToSign, signers, "myReferenceToJob")
{
    NonSensitiveTitle = "Non-sensitive title, used in notifications"
};
PortalJob job = PortalJob
        .builder("Job title", documents, signers)
        .withNonSensitiveTitle("Non-sensitive title, used in notifications")
        .build();
See also the javadoc for PortalJob.Builder
See the example given for creating the job, which includes the nonsensitive-title element in context.
<title>The main title, not included in notifications</title>
<nonsensitive-title>The non-sensitive title, used in notifications</nonsensitive-title>
See also the schema portal.xsd, and the element named nonsensitive-title
Order
The order attribute on signer is used to specify the order of the signers. In the example above, the signature job will only be available to the signers with order = "1". Once signed, the job becomes available to those with order = "2", and for the signer with order = "3" when those with order = "2" have signed.
Availability
The element availability is used to control the period of time a signature job is available to the signer(s).
<availability>
    <activation-time>2016-02-10T12:00:00+01:00</activation-time>
    <available-seconds>864000</available-seconds>
</availability>
The time specified in activation-time indicates when the job is activated, and the first signers are given the opportunity to sign the job. The duration specified in available-seconds applies to all signers. That is, all signers will have the same time to sign or reject the job from it becomes available to them. Thus, this period applies to each set of signers with the same order.
For example, enter 345600 seconds (4 days) for signers with an order:
Signers with
order = 1get 4 days from `` activation-time`` to sign.Signers with
order = 2will have the document made available immediately when all signers withorder = 1have signed. They will then have 4 days from the time signature job is made available.
Note
If you omit availability, the job will be activated immediately, and the job will be available for a maximum of 30 days for each set of order grouped signers.
Important
A signature job expires and stops if at least one signer does not sign within their time period when the job is available.
Important
Jobs that specify greater available-seconds than 7,776,000 seconds (90 days) are rejected.
Identifier in the signed document
The element identifier-in-signed-documents is used to specify how signers are to be identified in the signed documents. Allowed values are PERSONAL_IDENTIFICATION_NUMBER_AND_NAME, DATE_OF_BIRTH_AND_NAME and NAME, but not all are valid for all types of signature jobs and senders. For more information, see How are signers identified in a signed document?.
Note
You can specify a signature type and required authentication level. If signature type or required authentication level is omitted, default values will be set as specified by Signature type and Security level.
List<Document> documentsToSign = null; //As initialized earlier
var signers = new List<Signer>
{
    new Signer(new PersonalIdentificationNumber("00000000000"), new NotificationsUsingLookup())
    {
        SignatureType = SignatureType.AdvancedSignature
    }
};

var job = new Job(documentsToSign, signers, "myReferenceToJob")
{
    AuthenticationLevel = AuthenticationLevel.Four
};
Note
Note that only public organizations can do NotificationsUsingLookup.
Step 2: Get status changes
To find out what the status of the signature jobs you have created, you must periodically send requests to the signature service (polling). As a sender, you need to check to which job the update applies to, update the status in your system and then confirm it.
The response to this call will be one of two things:
status update: a
200 OKresponse that contains information about new status for one job. This is defined by the elementportal-signature-job-status-change-response.no update available: If there are no updates to your signature jobs, you will receive a
204 No Contentresponse.
Note
The next allowed polling time will be 10 minutes in the production environment if the queue is empty, while for test environments it will be between 5 and 30 seconds. In practice, the time for the next permitted polling request will be immediate as long as one receives a response that includes a status update.
The following example shows how this can be handled and examples of data to extract from a change response.
Note
Status updates you download will disappear from the queue. This allows you to ask for status updates in parallel, and you will not receive the same status update twice. It is therefore important that you confirm receipt of each status update as soon as possible, because if an error still occurs during transmission or processing, the receipt will be queued again after 10 minutes.
Responses will always include the next permitted poll time, which tells you when you can make the next request, and it is important that this time is met. If you send a request before this time has passed, you will receive a 429 Too Many Requests response. This will also contain a next permitted poll time, containing a new time.
PortalClient portalClient = null; //As initialized earlier

// Repeat the polling until signer signs the document, but ensure to do this at a
// reasonable interval. If you are processing the result a few times a day in your
// system, only poll a few times a day.
var change = await portalClient.GetStatusChange();

switch (change.Status)
{
    case JobStatus.NoChanges:
        //Queue is empty. Additional polling will result in blocking for a defined period.
        break;
    case JobStatus.Failed:
    case JobStatus.InProgress:
    case JobStatus.CompletedSuccessfully:
    {
        var signatureJobStatus = change.Status;
        var signatures = change.Signatures;
        var signatureOne = signatures.ElementAt(0);
        var signatureOneStatus = signatureOne.SignatureStatus;
        break;
    }
}

var pollingWillResultInBlock = change.NextPermittedPollTime > DateTime.Now;
if (pollingWillResultInBlock)
{
    //Wait until next permitted poll time has passed before polling again.
}

//Confirm the receipt to remove it from the queue
await portalClient.Confirm(change.ConfirmationReference);
PortalClient client = null; // As initialized earlier

PortalJobStatusChanged statusChange = client.getStatusChange();

if (statusChange.is(PortalJobStatus.NO_CHANGES)) {
    // Queue is empty. Must wait before polling again
    Instant nextPermittedPollTime = statusChange.getNextPermittedPollTime();
} else {
    // Received status update, act according to status
    PortalJobStatus signatureJobStatus = statusChange.getStatus();
    Instant nextPermittedPollTime = statusChange.getNextPermittedPollTime();
}

//Get status for signer
Signature signature = statusChange.getSignatureFrom(
        SignerIdentifier.identifiedByPersonalIdentificationNumber("12345678910")
);

//Confirm the receipt to remove it from the queue
client.confirm(statusChange);
To poll, you do a HTTP GET against <root-URL>/portal/ signature-jobs. Signature jobs that are not placed on a specific queue will be placed in a standard queue. If the job is placed on a specific queue, then the query parameter polling_queue must also be set to the name of the queue, e.g. <root-URL>/portal/signature-jobs? polling_queue=custom-queue. You should not include any request body on this call.
The following is an example of a response where part of the signature job has been completed:
<portal-signature-job-status-change-response xmlns="http://signering.posten.no/schema/v1">
   <signature-job-id>1</signature-job-id>
   <status>IN_PROGRESS</status>
   <confirmation-url>https://api.signering.posten.no/api/{sender-identifier}/portal/signature-jobs/1/complete</confirmation-url>
   <signatures>
       <signature>
           <status since="2017-01-23T12:51:43+01:00">SIGNED</status>
           <personal-identification-number>12345678910</personal-identification-number>
       </signature>
       <signature>
           <status since="2017-01-23T12:00:00+01:00">WAITING</status>
           <personal-identification-number>98765432100</personal-identification-number>
       </signature>
       <pades-url>https://api.signering.posten.no/api/{sender-identifier}/portal/signature-jobs/1/pades</pades-url>
   </signatures>
</portal-signature-job-status-change-response>
The X-Next-permitted-poll-time header will give the next permitted poll time in each response.
Finally, make a HTTP POST request to the confirmation-url to confirm that you have successfully retrieved the status change. If it is the last update and the job is completed successfully and Long-term validation and storage is used, this will mark the assignment as completed and stored. Otherwise, the assignment will be deleted from the signing portal.
Step 3: Get signed documents
PortalClient portalClient = null; //As initialized earlier
var jobStatusChanged = await portalClient.GetStatusChange();

//Get PAdES:
var pades = await portalClient.GetPades(jobStatusChanged.PadesReference);
PortalClient client = null; // As initialized earlier
PortalJobStatusChanged statusChange = null; // As returned when polling for status changes

// Retrieve PAdES:
if (statusChange.isPAdESAvailable()) {
    InputStream pAdESStream = client.getPAdES(statusChange.getpAdESUrl());
}
The response in the previous step contains the link pades-url. You can do a HTTP GET on it to download the signed document. For more information on the format of the signed document, see Signed documents.
This will include signing information for all signers who have so far signed the job. In most cases, it is not necessary to download the PAdES until all signers have the status SIGNED.
Specifying queues
An important and necessary feature for organizations using more than one application to create signature jobs through the API. It enables an application to retrieve status changes independent of other applications.
The pollingQueue property is used to assign jobs to a specified queue which is then used to retrieve status changes. If your organization is using more than one application/integration to access our API, we strongly recommend using a separate queue for each one. This is to ensure that one does not retrieve the others’ status updates. This may result in missing status updates for jobs in one of the applications, which in turn will result in a poor user experience. Only use the default queue, eg. not specifying a queue, when only one of your applications access our API.
To specify a queue, set pollingQueue through when constructing a Sender. Please note that the same sender must be specified when polling to retrieve status changes. The Sender can be set globally in ClientConfiguration or on every job.
PortalClient portalClient = null; //As initialized earlier

var organizationNumber = "123456789";
var sender = new Sender(organizationNumber, new PollingQueue("CustomPollingQueue"));

var documentsToSign = new List<Document>
{
    new Document(
        "Document title",
        FileType.Pdf,
        @"C:\Path\ToDocument\File.pdf"
    )
};

var signers = new List<Signer>
{
    new Signer(new PersonalIdentificationNumber("00000000000"), new NotificationsUsingLookup())
};

var portalJob = new Job("Job title", documentsToSign, signers, "myReferenceToJob", sender);

var portalJobResponse = await portalClient.Create(portalJob);

var changedJob = await portalClient.GetStatusChange(sender);
ClientConfiguration clientConfiguration = null; // As initialized earlier
PortalClient client = new PortalClient(clientConfiguration);

Sender sender = new Sender("000000000", PollingQueue.of("CustomPollingQueue"));

List<PortalDocument> documents = null; // create documents
List<PortalSigner> signers = null; // create signers

PortalJob job = PortalJob
        .builder("Job title", documents, signers)
        .withSender(sender)
        .build();

PortalJobResponse jobResponse = client.create(job);

PortalJobStatusChanged statusChange = client.getStatusChange(sender);
Include the polling-queue element in the portal-signature-job-request:
<portal-signature-job-request xmlns="http://signering.posten.no/schema/v1">
    <reference>123-ABC</reference>
    <polling-queue>custom-queue</polling-queue>
</portal-signature-job-request>
Delete documents
After receiving a status change, the documents can be deleted as follows:
This is currently not implemented in the C# client. However all contents of non-completed jobs, as well as completed jobs without Long-term validation and storage will be deleted automatically in 40 days.
PortalClient client = // As initialized earlier
PortalJobStatusChanged statusChange = client.getStatusChange();

var deleteDocumentsUrl = statusChange.getDeleteDocumentsUrl();
if (deleteDocumentsUrl != null) {
    client.deleteDocuments(deleteDocumentsUrl);
    // more likely, store the URL when a statusChange indicates
    // the job is indeed deletable, for use later if needed
}
Whenever a job is deletable, the status responses will contain a delete-documents-url element. Issuing a DELETE to this URL will delete all document contents from this job.